Building SD Images
openwifi boots from an SD card running one of three base operating systems, and you can build any of them from scratch:
- ADI Kuiper: an image similar to Debian or Ubuntu (the classic openwifi environment, and what the
fosdem.shdemo and most app notes assume). - OpenWrt: a router-style image with the LuCI web UI, with openwifi packaged as a kernel module.
- Buildroot: a small, fast-booting, reproducible image aimed at deployment, currently for the MicroPhase ANTSDR boards (
antsdr_e200,antsdr,e310v2). See Buildroot below.
You may not need to build anything
Prebuilt images exist for Kuiper and OpenWrt. If you only need a working board, flash a prebuilt image as in Getting Started (Kuiper) or the OpenWrt quick start below. Build from scratch when you need a custom kernel, a new board, or an image you control end to end.
The builds below assume you understand the boot chain and device tree. For the driver/dev loop see Software Development Workflow.
Which one should you build?
| ADI Kuiper | OpenWrt | Buildroot | |
|---|---|---|---|
| Feels like | A small Debian or Ubuntu box | A Wi-Fi router (LuCI web UI) | A minimal embedded appliance (serial console, BusyBox) |
| Best for | Research, the app-note workflows, full apt tooling | Router use cases | Small, reproducible deployment images |
| Build needs | Vivado 2022.2 + Vitis | Docker only (no Vivado) | Buildroot host packages + a prebuilt XSA (no Vivado) |
| openwifi tools | Built on the board | Packaged into the image (in $PATH) |
Built into the image under /root/openwifi |
| Boards | All supported boards | Most supported boards | antsdr_e200, antsdr, e310v2 |
ADI Kuiper build from scratch
Prerequisites
- Vivado 2022.2 with Vitis installed (you need
.../Vitis, notVitis_HLS). - An SD card of 16 GB or more.
-
Host packages:
sudo apt install flex bison libssl-dev device-tree-compiler u-boot-tools -y -
The usual environment variables (
XILINX_DIR,OPENWIFI_HW_IMG_DIR,BOARD_NAME) set as in Environment Setup. SDCARD_DIR: the mount point that contains the card'sBOOTandrootfspartitions (the last argument ofupdate_sdcard.shbelow).
1. Flash the ADI Kuiper base image
Download the "December 13, 2023 release (2022_r2)" (image_2023-12-13-ADI-Kuiper-full.zip) from the ADI Kuiper page and extract the .img. Flash it:
# Check the real sector count first: fdisk -l 2023-12-13-ADI-Kuiper-full.img
sudo dd bs=512 count=24182784 if=2023-12-13-ADI-Kuiper-full.img of=/dev/your_sdcard_dev
2. Edit the rootfs config files
Mount the card's BOOT and rootfs partitions on your PC and make these edits.
Add a static eth0 to rootfs/etc/network/interfaces:
auto lo
iface lo inet loopback
auto eth0
iface eth0 inet static
address 192.168.10.122
gateway 192.168.10.1
netmask 255.255.255.0
network 192.168.10.0
broadcast 192.168.10.255
Enable IP forwarding in rootfs/etc/sysctl.conf:
net.ipv4.ip_forward=1
Speed up shutdown in rootfs/etc/systemd/system.conf:
DefaultTimeoutStopSec=2s
Copy the udev rule that names the network device:
cp openwifi/kernel_boot/10-network-device.rules rootfs/etc/udev/rules.d/
3. Run update_sdcard.sh
From openwifi/user_space, run update_sdcard.sh with the mount point that holds BOOT and rootfs as its last argument:
cd openwifi/user_space
./update_sdcard.sh $OPENWIFI_HW_IMG_DIR $XILINX_DIR $SDCARD_DIR
It builds and copies onto the card:
- the kernel image:
adi-linux-64/arch/arm64/boot/Image(64-bit) oradi-linux/arch/arm/boot/uImage(32-bit) - the device tree:
kernel_boot/boards/zcu102_fmcs2/system.dtb(64-bit) orkernel_boot/boards/$BOARD_NAME/devicetree.dtb(32-bit) BOOT.BIN: fromkernel_boot/boards/$BOARD_NAME/output_boot_bin/BOOT.BIN- the openwifi driver, and the
user_space+webserverfiles.
(See Boot, Kernel & Device Tree for how those three artifacts are built.)
4. Configure the board files and first boot
Still on your PC, configure the BOOT partition for the specific board you have:
- Copy everything from
BOOT/openwifi/<board_name>/into the root of theBOOTpartition. - Delete
rootfs/root/kernel_modulesif it exists. - Delete
rootfs/etc/network/interfaces.newif it exists.
Then insert the card, set the board to SD-boot mode, connect antennas, and power on. Wire Ethernet to a PC at static IP 192.168.10.1 and log in. The ADI base image's initial password is analog (a prebuilt openwifi card would already be openwifi):
ssh root@192.168.10.122
passwd            # change it to openwifi
If login fails, see Troubleshooting. Enlarge the root partition (only needed if your SD card is larger than 16 GB) and reboot:
raspi-config --expand-rootfs
reboot now
5. Give the board internet (needed for the next step)
The on-board package installs need internet, routed through your PC. On the PC:
sudo sysctl -w net.ipv4.ip_forward=1
sudo iptables -t nat -A POSTROUTING -o <internet_nic> -j MASQUERADE
sudo ip route add 192.168.13.0/24 via 192.168.10.122 dev <board_nic>
Then confirm connectivity on the board:
route add default gw 192.168.10.1
ping <some_host_you_know>
Resolve any connectivity problem before continuing. (To make forwarding persistent on the PC, uncomment net.ipv4.ip_forward=1 in /etc/sysctl.conf.)
6. Install tools and build the on-board utilities
In the board's ssh session (set the clock first with date -s if needed, for example date -s "2026-08-16 12:00"):
sudo apt update
chmod +x /root/openwifi/*.sh

# DHCP server
sudo apt-get -y install isc-dhcp-server
cp /root/openwifi/dhcpd.conf /etc/dhcp/dhcpd.conf

# useful tools
sudo apt-get -y install hostapd tcpdump webfs iperf iperf3 libpcap-dev bridge-utils

# build the on-board tools
sudo apt-get -y install libnl-3-dev libnl-genl-3-dev
cd /root/openwifi/sdrctl_src && make clean && make && cp sdrctl ../
cd /root/openwifi/side_ch_ctl_src/ && gcc -o side_ch_ctl side_ch_ctl.c && cp side_ch_ctl ../
cd /root/openwifi/inject_80211/ && make clean && make && cd ..
7. Run openwifi
/root/openwifi/setup_once.sh    # once per new board (builds the on-board tools)
reboot                          # setup_once.sh does not reboot, so do it yourself
After the board comes back up, ssh in again and start openwifi:
cd /root/openwifi
./wgd.sh                         # "./wgd.sh 1" enables experimental 11n A-MPDU aggregation
ifconfig sdr0 up
iwlist sdr0 scan
./fosdem.sh                      # "./fosdem-11ag.sh" forces legacy 11a/g mode
Connect a phone or laptop to the "openwifi" SSID. You should get a 192.168.13.x address, and browsing to 192.168.13.1 shows the on-board webserver page. A few things to know (same as the prebuilt-image flow):
- The demo defaults to channel 36 (5 GHz). For a 2.4 GHz-only client, edit
hostapd-openwifi.confon the board and re-runfosdem.sh. - The Xilinx Viterbi decoder halts after ~2 hours (evaluation license). Reload the FPGA or power-cycle to recover.
- The ADRV9361-Z7035 has very low 5 GHz TX power, so keep nodes close on that board.
See Getting Started → Start the access point for more on the bring-up, and Research Features to start capturing CSI.
Faster paths
- Prebuilt img: flash the openwifi prebuilt
.img(dd bs=512 count=31116288 …) and skip to step 4. - Move a working card to a new board: re-do the "configure the board files" step for the new
board_nameon an existing card.
OpenWrt
OpenWrt packages openwifi as a kernel module and gives you the LuCI web UI. The build needs only Docker (no Vivado).
Board support matrix
| Board | Supported | Tested |
|---|---|---|
zc706_fmcs2, zed_fmcs2, adrv9364z7020, adrv9361z7035 |
✅ | ✅ |
zcu102_fmcs2 |
✅ | ✅ ⚠️ (fails on some boards, see Troubleshooting) |
antsdr, antsdr_e200 |
✅ | ✅ (antsdr tested by community) |
zc702_fmcs2, e310v2, sdrpi, neptunesdr |
✅ | (untested) |
OpenWrt quick start (prebuilt image)
This is the OpenWrt equivalent of the fosdem.sh demo.
-
Download the prebuilt image for your board from the image folder, then unzip and flash (example for
adrv9364z7020):cd ~/Downloads && gunzip openwrt-zynq-generic-analog_devices_zynq-adrv9364-squashfs-sdcard.img.gz sudo dd if=~/Downloads/openwrt-zynq-generic-analog_devices_zynq-adrv9364-squashfs-sdcard.img of=/dev/your_sdcard_dev status=progressCheck the target device
On a PC,
/dev/mmcblk0is often the PC's own internal eMMC, not the SD card. Runlsblkbefore and after inserting the card and use the device that appeared. Picking the wrongof=target overwrites that disk. -
Boot the board. After about a minute an
openwrt-openwifiSSID appears on 2.4 GHz channel 1. Connecting gives you an IP but no internet yet. -
Give the board (and its clients) internet through your PC. Connect Ethernet, and the board assigns your PC
192.168.10.1. The script ships in the openwifi repo next to the OpenWrt build instructions, underdoc/img_build_instruction/openwrt/. Find your interface names withip addr, then run the script below. Its first argument is the PC's internet-facing interface, the second is the board-facing one:./give_board_internet_access.sh wlan0 eth0 -
Reach LuCI at
http://192.168.10.122(http://openwrt.lanshould work too) from the PC, orhttp://192.168.13.1from a device on theopenwrt-openwifiSSID. There is no password by default. Set one for any real use. Network → Wireless is where you configure the radio: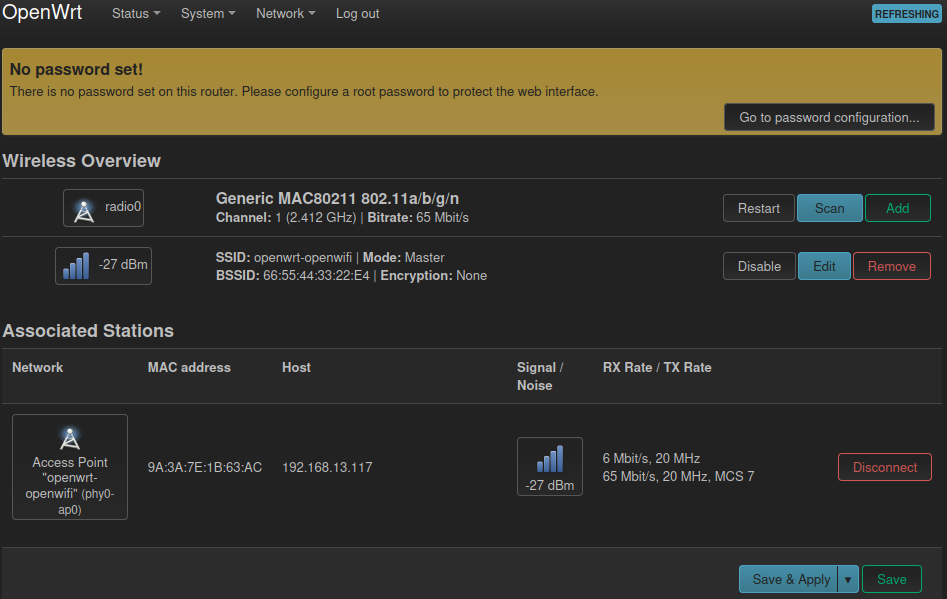
Research config, not a deployment config
The default OpenWrt network setup with the openwifi package is meant for research. For deployment, move eth0 into the wan zone as a DHCP client (not a DHCP server) and assign the wireless network to lan.
Build an OpenWrt image with openwifi
Prerequisite: Docker on a Linux host (Windows untested). Vivado is not required.
-
Clone the OpenWrt source with openwifi support (branch
openwrt-openwifi_v25.12.5= OpenWrt v25.12.5, Linux 6.12, mac80211 v6.18):git clone --branch openwrt-openwifi_v25.12.5 https://github.com/open-sdr/openwrt-openwifi.git -
Build the container (OpenWrt's Docker guide):
docker build --rm --tag openwrt:debian_12 --file ./Dockerfile ./openwrt-openwifi -
Start the container (drops you into an interactive shell in the mounted source):
./start_docker_openwrt_build.sh -
Update package feeds (pulls in the openwifi packages feed):
./scripts/feeds update ./scripts/feeds install -a -
Configure the build, either from a provided default:
cp configs/adrv9364z7020_defconfig .config…or manually with
make menuconfig, selecting your Architecture (zynq or zynqmp), your Board, and the openwifi kernel module under Kernel Modules → Wireless Drivers → Openwifi kernel package:


Handy extras: Network → SSH → openssh-sftp-server (enables
scpto the board) and Utilities → Editors → nano. -
Build, keeping the job count low (about 3) to avoid dependency-ordering errors (retry with fewer jobs if it fails):
make -j3 V=sc -
Flash the resulting image with the same
ddprocedure as the quick start. The build places the image underbin/targets/in the build tree (for the zynq target,bin/targets/zynq/generic/). Exit the container withCtrl+Dfirst.
Building for every board at once
doc/img_build_instruction/openwrt/build_images.sh in the openwifi repo repeats steps 5 and 6 for every *_defconfig in openwrt-openwifi/configs/, or only the boards passed as arguments, producing images under ./output_images. Each board is built by doc/img_build_instruction/openwrt/build_image_for_board.sh, which you can also run directly to build a single board.
OpenWrt tips
- Userspace tools are pre-installed. The openwifi package puts all
user_spacefiles under/root/openwifi(so the app-note scripts work), and installs the compiled tools (sdrctl,inject_80211,analyze_80211,side_ch_ctl) into/usr/bin, so they're in$PATH. - Kernel modules are packed in. No manual copying is needed, and
insmod side_chworks directly. - SSH uses mDNS:
ssh root@openwrt.lan, no password by default. - The app-note IQ and CSI workflows work on OpenWrt with minor differences (for example
insmod side_ch iq_len_init=4095, thenside_ch_ctland the host-side Python display scripts as usual).
Debugging the openwifi package
To iterate on the openwifi source without rebuilding from git each time, mount local sources into the container. Add to the docker run line in start_docker_openwrt_build.sh:
--volume "$(pwd)/openwifi:/openwifi" \
then point the package feed at a local checkout by editing OpenWrt's feeds.conf.default to replace the git openwifi feed with:
src-link openwifi /openwrt-openwifi-packages-feed
You can also bind-mount the OpenWrt tree under /workdir so paths printed in the container are copy-pasteable on the host. OpenWrt-specific issues (including the ZCU102 UART and SODIMM problem) are collected in Troubleshooting → OpenWrt-specific.
Buildroot
Buildroot produces a small (about 169 MB), fast-booting, reproducible SD image aimed at deployment rather than development. It replaces the multi-gigabyte Kuiper image where you only need openwifi to run. The build needs Buildroot's host packages but no Vivado. It does reuse a prebuilt system_top.xsa from openwifi-hw-img for the FPGA bitstream and PS initialization.
Board support
Buildroot currently targets three ANTSDR boards, all booted and tested on real hardware:
| Build name | Hardware | Serial console | RAM |
|---|---|---|---|
antsdr_e200 |
ANTSDR-E200 | ttyPS0 |
512 MiB |
antsdr |
ANTSDR-E310/ANT | ttyPS0 |
1 GiB |
e310v2 |
ANTSDR-E310V2 | ttyPS0 |
1 GiB |
All three share one kernel, module set, and ext4 root filesystem. Only the BOOT artifacts (SPL and U-Boot, device tree, bitstream, PS init, and UART selection) are per board.
Different boot chain from Kuiper
On Buildroot, BOOT.BIN is the U-Boot SPL, not the Xilinx FSBL composite Kuiper uses, so it needs the separate u-boot.img, and U-Boot configures the FPGA before Linux starts. Do not mix BOOT files between the two schemes by name alone. Buildroot does not use update_sdcard.sh, prepare_kernel.sh, or boot_bin_gen.sh.
Prerequisites
-
Buildroot host packages on Ubuntu or Debian:
sudo apt install build-essential git rsync cpio unzip bc file wget curl python3 libncurses-dev -
The Buildroot submodule, initialized after cloning openwifi:
git submodule update --init buildroot -
A matching
system_top.xsafor your board. By default the build reads it from../openwifi-hw-img/boards/<board>/sdk/system_top.xsa. Point elsewhere withOPENWIFI_HW_IMG_DIR, or supply a single file withOPENWIFI_XSA. The XSA must match the board and FPGA design.
Build
Run from the openwifi repository root. The first build compiles the shared system (toolchain, Linux 6.12, openwifi modules, rootfs). Later board builds reuse it and rebuild only that board's U-Boot and final image:
./buildroot-build.sh antsdr_e200 build
./buildroot-build.sh antsdr build
./buildroot-build.sh e310v2 build
Each board build produces an SD image and a complete-system update package:
output/antsdr_e200/images/openwifi-antsdr_e200-sdcard.img
output/antsdr_e200/images/openwifi-antsdr_e200-system.frm
Other subcommands are configure, menuconfig, rebuild-system (keep the toolchain, rebuild Linux, openwifi, and the rootfs), and clean (remove one board's output, keep the common system and download cache).
Write the SD card and boot
The first install needs the complete image, not a manual copy of BOOT files:
lsblk -o NAME,SIZE,MODEL,TRAN,MOUNTPOINTS
sudo umount /dev/sdX1 /dev/sdX2 2>/dev/null || true
sudo dd if=output/antsdr_e200/images/openwifi-antsdr_e200-sdcard.img of=/dev/sdX bs=4M conv=fsync status=progress
sync
Use the whole-disk device (/dev/sdX), not a partition. Then connect the serial console at 115200 8N1 and log in as root with password openwifi (the board comes up at 192.168.10.122/24 on eth0):
cat /etc/openwifi-board       # board name, detected at boot from the device tree
openwifi-start 0              # same as "./wgd.sh 0" in /root/openwifi
ip link show sdr0
The verified stable default is test_mode=0. Use other test modes only with a matching, explicitly tested FPGA and driver pair.
U-Boot owns the FPGA here
Buildroot keeps the bitstream U-Boot loaded, so wgd.sh reuses it instead of reprogramming, the opposite of the Kuiper and OpenWrt default. For normal operation prefer OPENWIFI_RELOAD_FPGA=0. For development against a topology-compatible bitstream, force a reload with OPENWIFI_RELOAD_FPGA=1 ./wgd.sh 0. See Reloading driver and FPGA without rebooting.
Update over Ethernet
Each board build also creates a .frm package (about 20 MB) with all BOOT files and the compressed ext4 rootfs. Install it from the host over plain SSH and SCP, with no daemon or token:
./host-tools/openwifi_fw_update.py --host 192.168.10.122 update --reboot \
    output/antsdr_e200/images/openwifi-antsdr_e200-system.frm
The package validates board identity, sizes, and SHA-256 digests, and it rejects a package built for a different board. It replaces the single active rootfs in place, so the update always reboots and has no automatic power-loss rollback. Keep power stable during the write.
Related pages
- Getting Started: flashing a prebuilt image and first bring-up.
- Boot, Kernel & Device Tree: how the kernel, device tree, and
BOOT.BINthat these builds install are produced. - Software Development Workflow: driver rebuilds and the live reload loop.
- Troubleshooting: boot and OpenWrt-specific issues.